Introduction
Lightning Web Components (LWC) is a powerful framework secured by Lightning Web Security (LWS), designed to help Salesforce developers build custom UI components. It offers a wide range of built-in components while also allowing you to create your own. But let’s be honest — sometimes you don’t want to reinvent the wheel. Instead, you reach for a trusty third-party JavaScript library to save time.
So, you import it into your Salesforce org as a Static Resource, hook it up to your LWC, and excitedly hit refresh… only to see absolute chaos. The layout is broken, colors are off, and elements are bouncing around like they just had five cups of coffee. What happened? Is it a bad dream? No, it's Synthetic Shadow DOM. Let's break it down before you rage-quit your project.
LWS or Synthetic Shadow DOM?
When things go south, the first instinct is to blame LWS or Salesforce itself. But in reality, the culprit is often Synthetic Shadow DOM, not LWS.
LWS, Salesforce’s latest security architecture, does introduce some restrictions, but they’re nowhere near as harsh as its predecessor, Lightning Locker — which was basically the overprotective parent of web security. Unlike Locker, LWS allows most modern JavaScript libraries to function without issues. So, if your third-party library is misbehaving, it's not security — it’s Synthetic Shadow DOM playing tricks on you.
Shadow DOM vs. Synthetic Shadow DOM (Document Object Model)
What is Shadow DOM?
Shadow DOM is a key technology that makes Web Components work. It lets you encapsulate a component’s styles and structure, preventing external CSS or logic from interfering. Think of it like noise-canceling headphones for your code — outside influences can’t mess with it.
When you attach Shadow DOM to an element, it creates a shadow boundary that hides its internal DOM structure from the rest of the page. No external CSS can style it, and no external JavaScript can select its elements. Simple and effective.
What is Synthetic Shadow DOM?
When LWC was introduced, not all browsers supported Shadow DOM. To ensure consistent behavior across platforms, Salesforce created Synthetic Shadow DOM, a polyfill that mimics Shadow DOM. The catch? It’s only a partial implementation.
Today, most modern libraries support Native Shadow DOM, but the small differences between Native and Synthetic Shadow DOM can lead to unexpected styling and behavior in LWC. And that’s where the headaches begin.
A Practical Example: The Case of the Mismatched Squares
Let’s say you’re adding a simple script that creates and styles a square. You load this as a Static Resource:
const styleElement = document.createElement('style');styleElement.textContent = ` .third-party-square { height: 200px; width: 200px; background-color: green; border: 20px solid orange; }`;document.head.appendChild(styleElement);
function createSquare(parentElement, className) { const squareElement = document.createElement('div');
squareElement.className = `third-party-square ${className}`; parentElement.appendChild(squareElement);}
And import it into LWC:
<template> <div class="slds-theme_default slds-grid_vertical slds-p-around_x-small"> <h2 class="slds-col slds-text-heading_medium">Synthetic Shadow Dom</h2> <lightning-layout class="slds-p-around_x-small"> <lightning-layout-item class="slds-p-around_xx-small"> <h3 class="slds-text-heading_small">Third-Party Square</h3> <div lwc:ref="thirdPartySquareContainer" class="square-container"></div> </lightning-layout-item> <lightning-layout-item class="slds-p-around_xx-small"> <h3 class="slds-text-heading_small">LWC Square</h3> <div class="square-container"> <div class="third-party-square square"></div> </div> </lightning-layout-item> </lightning-layout> </div></template>
import { LightningElement } from 'lwc';import { loadScript } from 'lightning/platformResourceLoader';import thirdPartyExample from '@salesforce/resourceUrl/thirdPartyExample';
export default class SyntheticShadowDemo extends LightningElement {
hasRendered = false;
renderedCallback() { if(!this.hasRendered) { this.hasRendered = true; loadScript(this, thirdPartyExample) .then(() => { createSquare(this.refs.thirdPartySquareContainer, 'square'); }); } }}
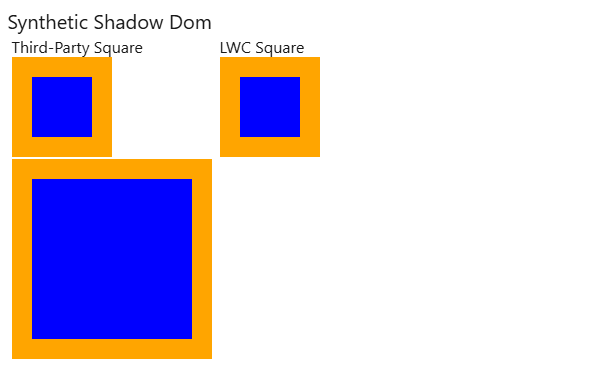
Then override the background color of the square in CSS of the LWC and add a class that reduces its size to 100px.
.third-party-square { background-color: blue;}
.square { height: 100px; width: 100px;}
Expecting to see a small blue square? Nope. Instead, the third-party square stubbornly remains big and green, mocking your efforts.

Why?
Since the square was dynamically created, it didn’t inherit any of the LWC’s scoped styles. LWC encapsulation blocked your CSS from affecting it. The fix? Use lwc-dom="manual" on the container element:
<div lwc:dom="manual"></div>
This tells LWC, “Hey, let elements that were added via JavaScript to inherit styles inside this container!"
New third-party square container div declaration:
<div lwc:ref="thirdPartySquareContainer" lwc:dom="manual" class="square-container"></div>
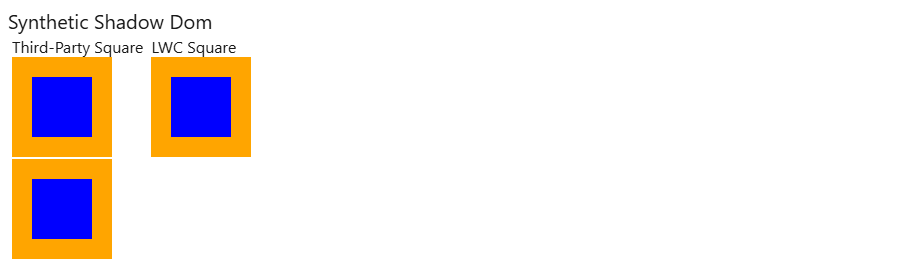
Actual appearance of the LWC:

Problem solved.
CSS Style Scoping Issues: The FullCalendar Nightmare
Let’s level up the challenge. Imagine you are using FullCalendar and want to change the styles of events. However, FullCalendar calculates rendering based on the event height. What could go wrong? Let's update our external script to use the dimensions of another element to render a new element and see what happens.
const styleElement = document.createElement('style');styleElement.textContent = ` .third-party-square { height: 200px; width: 200px; background-color: green; border: 20px solid orange; }
.third-party-square-dims-copy { background-color: blue; border: 20px solid orange; margin-top: 0.125rem; }`;document.head.appendChild(styleElement);
function createSquare(parentElement, className) { const squareElement = document.createElement('div');
squareElement.className = `third-party-square ${className}`; parentElement.appendChild(squareElement);
const squareDimsCopyElement = document.createElement('div'); squareDimsCopyElement.className = `third-party-square-dims-copy`; squareDimsCopyElement.style.height = squareElement.getBoundingClientRect().height + 'px'; squareDimsCopyElement.style.width = squareElement.getBoundingClientRect().width + 'px'; parentElement.appendChild(squareDimsCopyElement);}
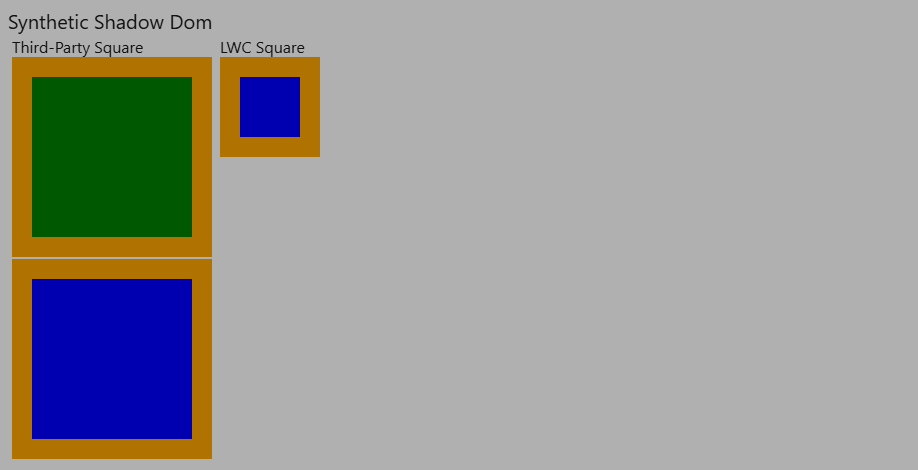
And this is how our LWC changed on UI:
And once again… things aren’t behaving as expected.
Here’s what’s happening: LWC assigns scoped styles asynchronously. It means that styles aren’t applied to an element at the exact moment it connects to the DOM. Instead, there’s a delay meaning that when an element is first attached, it doesn’t yet have its LWC styles.
Now, if a third-party library tries to access or calculate styles immediately after attaching an element, it will rely on the wrong styles — because they haven’t been applied yet!
Let’s break it down:
-
We call the
createElementfunction to generate our first square. -
In the same function call, we create a second square, basing its dimensions on the first.
-
But here’s the issue: The first square still doesn’t have its LWC styles at this point.
-
As a result, the second square gets dimensions based on incorrect or missing styles from a static resource instead of the LWC bundle.
It’s like measuring your new furniture based on an invisible couch — things just won’t fit!
Want to see exactly what’s going wrong? Add a debugger statement at the end of the createElement function and watch it unfold in real time.
How to Fix It?
Since this is a fundamental JavaScript behavior, there’s no out-of-the-box solution. But here are two workarounds:
-
Modify the library’s code (not recommended because updates become a nightmare).
-
Inject styles dynamically inside LWC (better approach):
This method makes the styles less restrictive, ensuring they apply properly without breaking encapsulation. The key is scoping styles inside your LWC component but outside Synthetic Shadow DOM restrictions.
renderedCallback() { if(!this.hasRendered) { this.hasRendered = true;
const randomString = `coral-${Math.random().toString(20).substring(2, 6)}`; this.refs.thirdPartySquareContainer.dataset.styleScope = randomString; const styleElement = document.createElement('style'); styleElement.textContent = ` [data-style-scope="${randomString}"] .third-party-square { background-color: blue; }
[data-style-scope="${randomString}"] .square { height: 100px; width: 100px; } `; this.template.insertBefore(styleElement, this.template.firstChild); loadScript(this, thirdPartyExample) .then(() => { createSquare(this.refs.thirdPartySquareContainer, 'square'); }); } }
Now when LWC loads we can see this:
LWC Mixed Shadow Mode: The Future of Styling in LWC
Salesforce has acknowledged these challenges and introduced Mixed Shadow Mode in Summer ‘22 as a Developer Preview (now in Beta). This feature allows you to run your LWC components using Native Shadow DOM, which means:
-
Styles apply correctly without extra workarounds.
-
Third-party libraries behave as expected.
-
Less debugging, more productivity!
However, there’s a catch: Native Shadow DOM blocks external styles, including Salesforce Lightning Design System (SLDS) styles.In Native Shadow DOM any style defined outside of component is ignored. So, in order to apply styles, they should be defined on the component level instead of document. And this is also why none of the Salesforce Lightning Design System(SLDS) styles work inside of the component — they are defined at the document level. So, you have to define your own styles and use SLDS hooks to make it leverage Salesforce Lightning look.
To see the difference, check out the refactored code using Mixed Shadow Mode:
<template>
  <div class="crl-main-container crl-vertical-container crl-p-around_xx-small">
    <h2 class="crl-flex-grow_none crl-heading-medium">Native Shadow Dom</h2>
    <div class="crl-flex-grow_none crl-horizontal-container crl-p-around_xx-small">
      <div class="crl-flex-grow_none crl-p-around_xx-small">
        <h3 class="crl-heading-small">Third-Party Square</h3>
        <div lwc:ref="thirdPartySquareContainer" class="square-container"></div>
      </div>
      <div class="crl-flex-grow_none crl-p-around_xx-small">
        <h3 class="crl-heading-small">LWC Square</h3>
        <div class="square-container">
          <div class="third-party-square square"></div>
        </div>
      </div>
    </div>
  </div>
</template>
* { box-sizing: border-box;}
.crl-main-container { background-color: white; display: flex; flex-direction: column;}
.crl-vertical-container { display: flex; flex-direction: column;}
.crl-horizontal-container { display: flex;}
.crl-flex-grow_none { flex-grow: 0;}
.crl-heading-medium { font-size: 1.25rem; line-height: var(--lwc-lineHeightHeading, 1.25);}
.crl-heading-small { font-size: 1rem; line-height: var(--lwc-lineHeightHeading, 1.25);}
.crl-p-around_xx-small { padding: var(--lwc-spacingXxSmall, 0.25rem);}
.third-party-square { background-color: blue;}
.square { height: 100px; width: 100px;}
import { LightningElement } from 'lwc';import { loadScript } from 'lightning/platformResourceLoader';import thirdPartyExample from '@salesforce/resourceUrl/thirdPartyExample';
export default class NativeShadowDemo extends LightningElement {
static shadowSupportMode = "native"; hasRendered = false;
renderedCallback() { if(!this.hasRendered) { this.hasRendered = true;
loadScript(this, thirdPartyExample) .then(() => { createSquare(this.refs.thirdPartySquareContainer, 'square'); }); } }}
let isStylesSet = false;function createSquare(parentElement, className) { if (!isStylesSet) { const styleElement = document.createElement('style'); styleElement.textContent = ` .third-party-square { height: 200px; width: 200px; background-color: green; border: 20px solid orange; }
.third-party-square-dims-copy { background-color: blue; border: 20px solid orange; margin-top: 0.125rem; } `; parentElement.getRootNode().appendChild(styleElement); }
const squareElement = document.createElement('div');
squareElement.className = `third-party-square ${className}`; parentElement.appendChild(squareElement);
const squareDimsCopyElement = document.createElement('div'); squareDimsCopyElement.className = `third-party-square-dims-copy`; squareDimsCopyElement.style.height = squareElement.getBoundingClientRect().height + 'px'; squareDimsCopyElement.style.width = squareElement.getBoundingClientRect().width + 'px'; parentElement.appendChild(squareDimsCopyElement);}
And the component on UI looks like this:
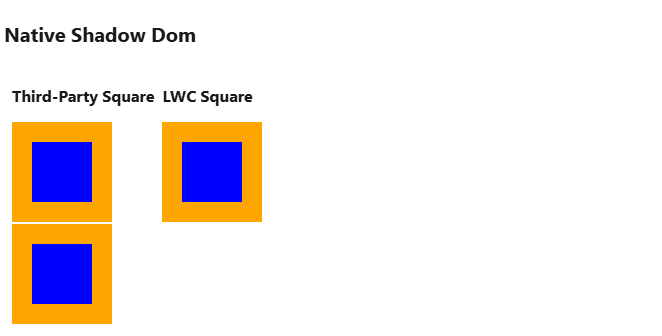
Now, styles from your LWC apply seamlessly — no more manually injecting styles or struggling with lwc-dom="manual".
Final Thoughts
If you’re dealing with weird third-party library behavior in LWC, remember:
-
Check Synthetic Shadow DOM behavior first.
-
Use
lwc-dom="manual"for dynamically added elements. -
Inject styles dynamically if immediate styling is required.
-
Consider enabling Mixed Shadow Mode for a long-term fix.
By mastering these techniques, you’ll spend less time debugging and more time actually building cool stuff in Salesforce. And next time a third-party library misbehaves, you’ll know exactly where to look — no need to panic! 🚀